
DISCLAIMER
Installing Libreboot on your device can potentially void its warranty and may cause irreversible damage if not done correctly. Proceed with caution and at your own risk. I provide this tutorial “as is” and without any warranty, express or implied. I disclaim all liability for any damage or issues that may arise from following these instructions. By using this tutorial, you acknowledge that you understand the risks involved and release me from any claims or damages that may result. Make sure to back up your data and be prepared for potential complications.
Reminder
- In terms of performance, the HP EliteBook 820 G2 is currently the best model supported by Libreboot . However, if you pursue freedom, this model should not be your choice because, despite the installation of Libreboot, many proprietary blobs remain. Consider the ThinkPad X200 and refer to this guide .
- This is a brief reference, not a comprehensive step-by-step guide. As stated by the Libreboot project, the HP EliteBook 820 G2 is a very difficult machine to flash, and before writing this tutorial I also experienced failures. Please refer to the official documentation, and if you encounter problems, consult #libreboot on Libera.Chat.
Tutorial
Again, this tutorial is not comprehensive and it is strongly recommended to consult the official guide concurrently: https://libreboot.org/docs/install/hp820g2.html
1. Build ROMs
Refer to this guide: https://libreboot.org/docs/build/
Debian GNU/Linux 12 is recommended. Please do not use Sid as it will result in errors; if you do not have Debian GNU/Linux 12, set up a virtual machine using QEMU and AQEMU.
2. Write a MAC address to the ROM you wish to flash
Build idftool from the coreboot repo
and nvmutil from the Libreboot repo
.
 $ git clone https://github.com/coreboot/coreboot
 $ cd coreboot/util/ifdtool
 $ make
 $ cd ../../..
 $ git clone https://codeberg.org/libreboot/lbmk
 $ cd libreboot/util/nvmutil
 $ make
 $ cd ../../..
Depending on the version you wish to use (if you are unsure, avoid txtmode ROMs as they may cause graphical rendering issues), choose a ROM file and write a MAC address.
 $ ./coreboot/util/ifdtool/ifdtool -x seaxxxx_hp820g2_12mb_libgfxinit_corebootfxxxx.rom
 $ ./libreboot/util/nvmutil/nvm flashregion_3_gbe.bin setmac
 $ ./coreboot/util/ifdtool/ifdtool -i gbe:flashregion_3_gbe.bin seaxxxx_hp820g2_12mb_libgfxinit_corebootfxxxx.rom
This will generate a new *.rom.new file.
For further details refer to this guide: https://libreboot.org/docs/install/nvmutil.html
3. Expand the resulting *.rom.new file
 $ dd if=/dev/zero of=4mb.bin bs=4M count=1
 $ cat seaxxxx_hp820g2_12mb_libgfxinit_corebootfxxxx.rom.new 4mb.bin > libreboot16.rom
4. Learning about your chips and flashing
On your mainboard there are two chips: a 2MB private chip and a 16MB system chip.
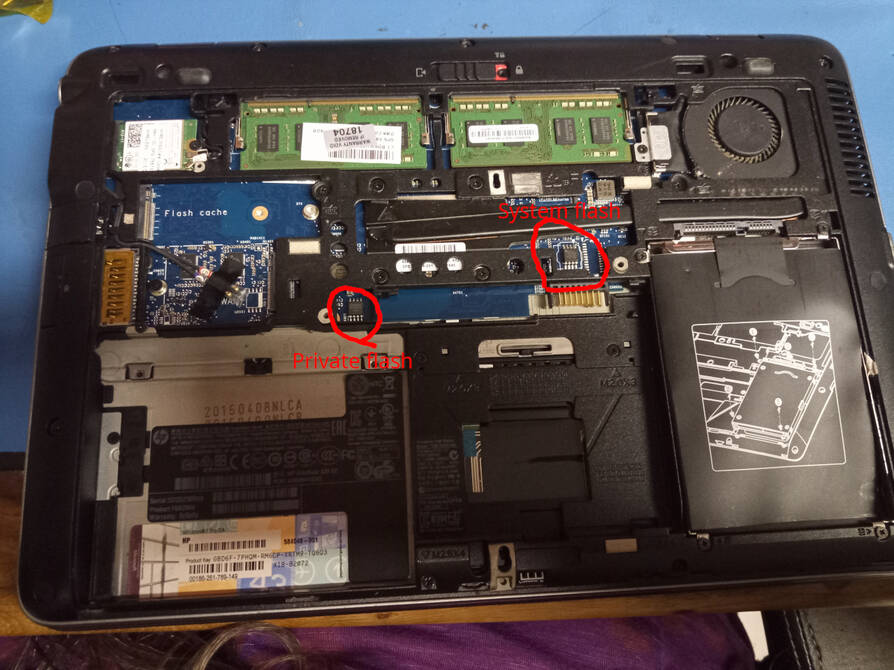
Please locate a dot in one corner of each chip – this dot indicates pin 1.
First, back up both chips.
The 2MB private chip is used to verify the stock BIOS and all we need to do is disable that blasted tyrant chip:
# flashprog -p PROGRAMMER --erase
Repeat this step two or three times.
Then flash the expanded ROM as follows:
 # flashprog -p PROGRAMMER --ifd -i gbe -w libreboot16.rom --noverify-all
 # flashprog -p PROGRAMMER --ifd -i bios -w libreboot16.rom --noverify-all
 # flashprog -p PROGRAMMER --ifd -i me -w libreboot16.rom --noverify-all
 # flashprog -p PROGRAMMER --ifd -i fd -w libreboot16.rom --noverify-all
Finally, erase the tyrant private chip again:
# flashprog -p PROGRAMMER --erase
5. Finalisation
Reinsert the battery and you should immediately see a joyfully leaping deer on your screen — it is time to celebrate ^_^
If not, double-check that all steps were followed precisely and consult #libreboot on Libera.Chat if you have questions.